How To Connect Multiple LED Strip Lights Together?
Table of Contents
You have two main options for connecting multiple LED strip lights: soldering or using LED strip connectors. LED strip connectors are the way to go for easy installation. However, soldering is your best bet if you’re looking for a more permanent and secure connection. The wiring method you choose—whether series or parallel—also matters, with the voltage rating of the LED strips and the total run length being key factors to consider.
Additionally, it’s essential to choose compatible LED strip connectors. Using an incompatible connector can result in a failed connection.
Benefits of Connecting Multiple LED Strip Lights
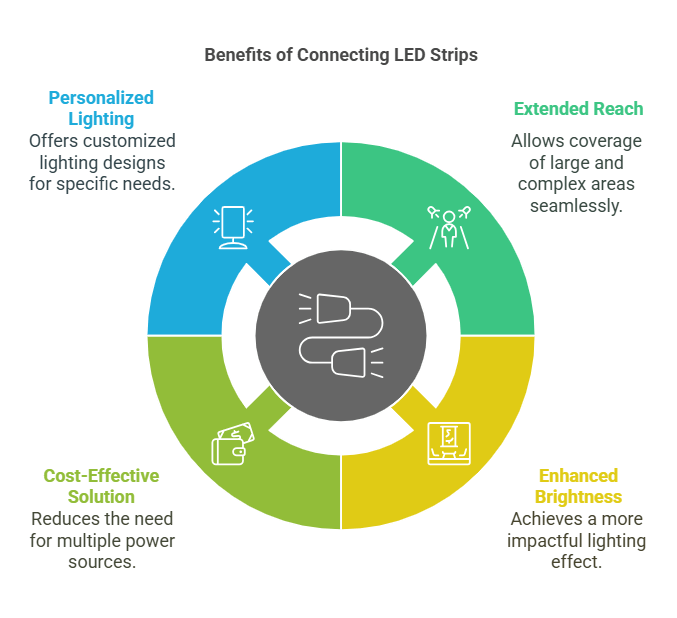
Combining multiple strips is an excellent choice for a large-scale LED strip light installation. Beyond just covering expansive areas, this approach offers several additional advantages:
- Extended Reach & Comprehensive Coverage: The primary benefit of linking multiple LED strips is extending the length as needed. Typically, LED strips are available in 5-meter reels. You can connect various strips for larger spaces to cover the area seamlessly. Additionally, you can cut and connect the strips to fit around corners and edges, ensuring a polished lighting effect even in curved or tricky spaces.
- Enhanced Brightness Through Parallel Connections: Connecting multiple LED strips in parallel can achieve a brighter and more impactful lighting effect. This method is beneficial for illuminating dark areas and adding function and drama to your room.
- Cost-Effective Solution: Using multiple LED strips can also be a cost-efficient option. You won’t need numerous power adapters and outlets, which can lower overall expenses. Plus, by incorporating dimmers, you can adjust the brightness, reducing energy consumption and saving on costs.
- Personalized Lighting Solutions: Connecting multiple LED strips gives you more control over your lighting setup, allowing customized solutions. For instance, if you’re backlighting a mirror, you can cut the LED strips into four pieces to match the mirror’s dimensions. You create a cohesive and tailored lighting design by powering all the strips from a single source. For detailed guidance on backlighting mirrors, check out our guide on DIY LED light strips for mirrors.
Is It Safe to Link Multiple LED Strip Lights?
One of the advantages of LED strip lights is their ability to be easily extended by adding more strips. But how safe is it to do so? The straightforward answer is yes; it’s generally safe as long as you don’t exceed the power capacity of your power source. This means the total power usage of all connected LED strips must stay within the power supply’s limits.
Overloading the power source can lead to dangerous situations, including fire risk. Additionally, issues within the LED strips themselves can also pose safety concerns. To ensure safety when connecting multiple LED strips together, consider these key points:
- Check the Combined Voltage in Advance: Before connecting, ensure that the total voltage of your LED strips matches the power supply. For instance, if your strips are rated at 24V, the power supply must also be 24V. A power source with a lower voltage, such as 12V for 24V strips, can create hazardous conditions.
- Opt for High-Quality LED Strips: Always use high-quality LED strips to ensure safety. Lower-quality strips may be made from substandard materials, leading to issues when multiple strips are connected. For reliable performance, consider our LED strips. Additionally, you can explore our guide for top LED strip light manufacturers worldwide.
Critical Considerations for Connecting Multiple LED Strip Lights
Ensuring a safe and effective setup is essential when connecting multiple LED strips. Here are some key factors to keep in mind:
Connection Methods
You can connect multiple LED strips either in series or parallel circuits. Below are the details of each method:
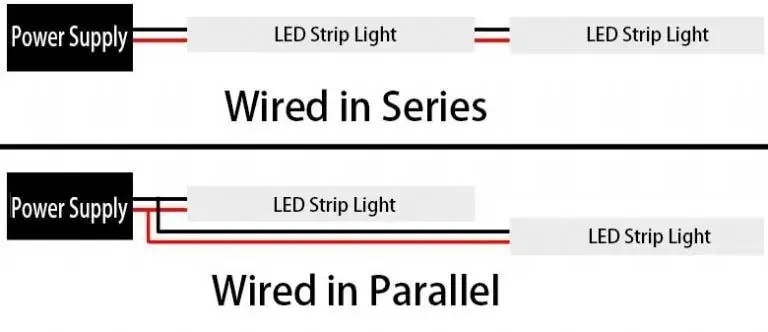
1. Series Connection
The simplest method for connecting LED strips in a series circuit is to attach the end of one strip to the beginning of the next using an LED strip connector or soldering. This method doesn’t require separate wiring for each strip to the power supply, making it easier for beginners and DIY projects.
However, a series connection is best suited for short-term installations due to a significant voltage drop as the strip length increases. Since power is supplied only at one end, the voltage and brightness diminish over longer distances, leading to noticeable inconsistencies in brightness.
2. Parallel Connection
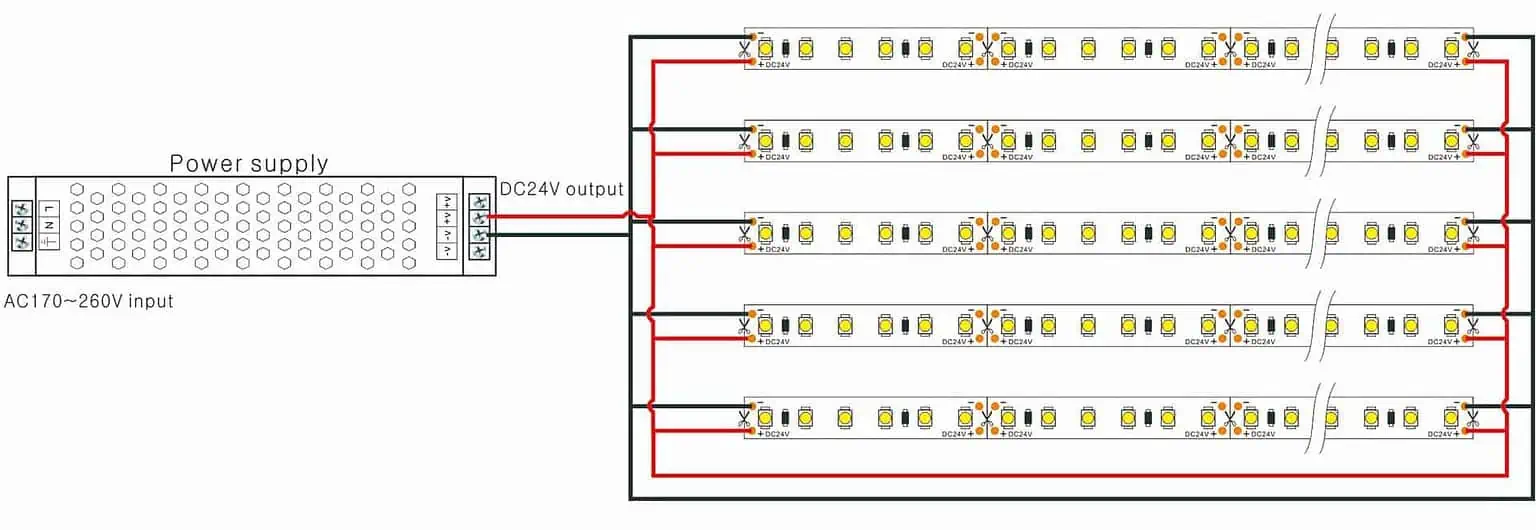
A parallel connection is the more professional and recommended method for joining multiple LED strips. In this setup, each strip is directly connected to the power source, ensuring that each strip receives adequate current flow for consistent brightness.
The main challenge of a parallel connection is its complex wiring. You’ll need to manage several wires running from different points on the LED strips to the power source. Most power supplies have only a positive and negative output wire, so you must split these into multiple connections. This can be tricky for beginners and requires careful attention to prevent voltage drops, especially if the strips are far from the power source. Additionally, you may need to invest in thicker gauge wires for longer runs, making this method more costly.
Optimal Number of LED Strips for Chain Connections
Connecting excessive LED strips in a single chain can shorten the driver’s lifespan. To prevent this, it’s essential to determine the maximum number of strips that can be connected without overstressing the power supply. Use the following formula to calculate the safe number of strips:
Number of Strips = Power Supply (in Watts) / Power Consumption per Strip
For instance, if you have a 500-watt power supply and each LED strip consumes 100 watts, you can calculate the maximum number of strips as follows:
Number of Strips = 500 watts / 100 watts = 5 strips
To ensure the longevity and efficiency of your power source, it is advisable not to operate at total capacity. Keeping the load at about 80% is recommended, which means using no more than four strips in this example. This practice enhances performance and extends the life of your LED setup.
Ensuring Robust Connections for LED Strips
The strength and durability of your connections are crucial, regardless of whether you choose series or parallel configurations for your LED strips. Weak connections can loosen over time, potentially breaking the circuit and causing the lights to turn off. Therefore, the robustness of each connection should be a key consideration.
Using LED strip connectors is a simpler and more convenient method for beginners. However, these connectors may not always provide the most durable solution. Over time, they can become loose, particularly as the heat from the fixtures might cause the plastic connectors to melt.
Soldering is recommended for a more reliable and permanent connection, although it requires more skill. This method involves heating a soldering iron and applying pre-tinted solder, which can be challenging for novices. However, the result is a strong and stable connection that significantly reduces the risk of disconnection.
Types of LED Strip Connectors
Choosing the correct connector type is also essential when using LED connectors clips to join multiple strips. Options include gapless pin connectors and jumper cord connectors. Gapless pin connectors offer a seamless connection by fitting pins directly into the endpoints of the LED strips, creating a continuous flow. These connectors come in various types, each suited to different LED strip specifications. For example, connecting multiple Tunable white LED strips would require a 3-pin LED strip connector. Below is a chart detailing different LED strip connectors suitable for various types of LED strips.
| LED Strip Connector | Type Of LED Strip Light |
| 2 PINs LED Strip Connector | Single-color LED strips |
| 3 PINs LED Strip Connector | Tunable white LED strips & Addressable LED strips |
| 4 PINs LED Strip Connector | RGB LED strips |
| 5 PINs LED Strip Connector | RGB+W or RGBW LED strips |
| 6 PINs LED Strip Connector | RGB+CCT & RGB+Tunable white LED strips |
Jumper cord connectors primarily serve as extension cords that link one LED strip to another. These connectors enhance the versatility of LED strip setups, making them ideal for installations that require navigating corners. They also enable easy bending of LED strips, simplifying their arrangement.
LED strip connectors are categorized based on Ingress Protection (IP) ratings, indicating their resistance to environmental elements. The classifications include:
- IP20: Non-waterproof LED strip connector
- IP52: LED strip connector with a single-sided glue coating for moisture resistance
- IP65: Hollow tube waterproof LED strip connector
- IP67/IP68: Solid tube waterproof LED strip connectors for complete submersion protection
In addition to IP ratings, LED strip connectors vary in shape and function. Options include COB LED strip connectors, 90-degree LED strip connectors, and Hippo-M LED strip connectors. It’s essential to match the connector’s Printed Circuit Board (PCB) width with that of the LED strip to ensure compatibility. Joint PCB widths for these connectors are:
- 5mm
- 8mm
- 10mm
- 12mm
Choosing the correct connector size is crucial, as a mismatch between the connector and the strip width will prevent a proper fit.
Understanding LED Strip Length and Voltage Drop
When connecting multiple LED strips, monitoring their total length is crucial because an increase in length correlates with an increase in voltage drop. This phenomenon results in diminished brightness along the strip, with LEDs closer to the power source appearing brighter than those further away.
Relationship Between Strip Length and Voltage
- Voltage Drop Indicator: As length increases, so does voltage drop, reducing brightness.
- Low-Voltage LED Strips: Typically, 12V LED strips maintain uniform lighting up to a length of 5 meters. Beyond this, significant voltage drops occur, necessitating external power injections at specific points to maintain brightness.
- Guide on Power Injection: For details on properly injecting power into your LED strips, refer to guides like “How To Inject Power Into LED Strip?”
High-Voltage LED Strips: These strips can handle longer runs without power injections. For example, a 48V LED strip may run up to 60 meters from a single power feed, allowing you to connect up to 12 five-meter strips to one power source without complicated parallel connections. However, it’s essential to consider the total power consumption to determine the maximum number of strips per power source.
Choosing the Right Strip Length: While the standard LED strip length is around 5 meters per reel, various lengths are available to accommodate larger installations without multiple connections. Guides on different strip lengths and their voltage ratings can provide further insight.
Voltage Requirements and Safety Considerations: Although high-voltage LED strips facilitate longer lengths, they may not be suitable for all installations due to safety concerns in specific environments.
Methods for Connecting Multiple LED Strip Lights
As mentioned previously, connectors or soldering are two primary ways to connect LED strip lights. Soldering provides a more durable connection, but using connectors is a more straightforward approach for those new to working with LED strips. Here’s a detailed guide on both methods:
Method #1: Using a Connector
LED strip connectors come in various types, essential for connection needs, such as strip-to-strip, strip-to-wire, and strip-to-power. Here’s how to effectively use connectors for joining multiple LED strips:
Step 1: Select the Appropriate LED Strip Connectors
First, identify the type of LED strip you are using, as this determines the pin configuration of the connectors. For example, a single-color LED strip requires a 2-pin connector, whereas an RGB LED strip needs a 4-pin connector. Additionally, consider the width of the LED strip to ensure the connectors fit correctly. If your LED strip is waterproof, opt for connectors rated IP67 or IP68 to maintain a waterproof seal.
Step 2: Prepare and Connect the LED Strips
Wondering how to connect LED lights together with a connector? Well, LED strips typically have an adhesive backing for easy application. Begin by peeling back the adhesive tape at both ends of the strips you intend to join. Attach the connector to one end of an LED strip and then link it to another strip. During this process, ensure that the positive and negative markings on the LED strip align with those on the connector to avoid any electrical mismatches.
Step 3: Secure the Connection
Once the LED strips are connected, secure the joint by snapping on the provided plastic cover over the connector. This cover helps protect and seal the connection. Press firmly on the cover to ensure it’s tightly sealed. You can now install your extended LED strip setup in your chosen location.
By following these steps, you can efficiently and safely extend the length of your LED lighting setup, whether you choose the simplicity of connectors or the durability of soldering.
Method #2: Soldering
Soldering offers a more professional and durable method for connecting multiple LED strips, which is ideal for permanent installations. Here’s a step-by-step guide to effectively use soldering for joining LED strips:
Step 1: Prepare the Solder Pads
Start by ensuring all LED strip ends are cleanly cut to fit precisely. Select one strip and carefully peel off the adhesive backing from the solder pads, preparing it for connection. This strip will serve as the top layer in the connection.
Step 2: Apply Solder to the Pads
Heat your soldering iron. Before joining, pre-tin the solder pad on the second strip, which will act as the bottom piece in the assembly. Continually heat the pad itself, not the solder directly. Once the pad is hot enough, apply solder to the pad, ensuring not to touch the iron directly with the solder but rather let the heat from the pad melt the solder.
Step 3: Join the Strips
Position the first strip (non-tinned) directly above the tinned pads of the second strip. Reheat the solder on these pads to meld the two strips together. Hold the soldering iron steady, allow the solder to flow, and create a bond without overheating the strip. Overheating could damage the circuitry by causing the casing to detach from the PCB substrate. Once cooled, you might add a small amount of solder on top of the pad to reinforce the connection.
These steps will securely connect your LED strips, providing a robust, long-lasting lighting setup.
Comparing LED Strip Connectors and Soldering: Which Connection Method is Superior?
Using LED strip connectors to link multiple strips is an excellent choice for simplicity and convenience. This method is straightforward: purchase the connectors and attach them to the strips, requiring no specialized skills or tools. However, one potential drawback of using connectors is their tendency to loosen over time, which might compromise the setup’s stability.
Conversely, soldering offers a more permanent solution. It demands more technical expertise and a soldering iron, resulting in a more robust and reliable connection. Soldering is typically preferred for projects with paramount durability and a long-lasting connection.
| Factors | LED Strip Connector | Soldering |
| Stability | Acceptable | High |
| Convenience | High Convenience | Low Convenience |
| Maintenance | Easy | Hard |
Series vs. Parallel Connection for Multiple LED Strip Lights: Which is Preferable?
Deciding between a series or parallel connection for hinges on various factors, such as the voltage of the LED strips, the total length of the run, the need for consistent brightness, and installation ease.
A series connection might suit high-voltage LED strips, which can handle longer runs without significant voltage drops. However, while a series connection is possible for low-voltage LED strips, it risks voltage drops over extended lengths, making it less ideal for such setups.
On the other hand, a parallel connection ensures more uniform lighting across all strips, making it better for larger installations where consistent brightness is crucial. Each strip in a parallel setup directly connects to the power source, receiving equal voltage. Despite its benefits, parallel connections are more complex to install. They require more wiring, multiple power supplies, and often professional installation, making it more costly than a series connection.
| Series connection | Parallel connection | |
| Pros | Easy installation, ideal for beginners and DIY projects low cost | Consistent brightness is ideal for large projects |
| Cons | Not suitable for sizable installation, Voltage drop issues | Complex installation needs professional help with a higher cost |
How to connect multiple LED strips to one power source?
To link multiple LED strips to a power supply, you can either connect them directly to the power socket or utilize an LED strip light splitter. Direct connections are straightforward, though they might require multiple power sources depending on your setup. Alternatively, using a splitter can simplify the process. Connect LED strip lights together to one end of the splitter, then plug the power supply Supply Unit (PSU).
When connecting strip lights, it’s crucial to ensure that their power consumption and voltage ratings align with the power supply’s capabilities. To avoid overloading, it’s advisable to use only up to 80% of the power supply’s capacity, leaving a 20% margin for safety.
Conclusion
For consistently bright and professionally installed lighting, parallel wiring is recommended. If you’re less experienced or prefer simplicity, series wiring might be suitable, though be aware of potential voltage drops as the length increases. To mitigate this, consider external power injections. LED strip connectors are a convenient option for easy connections.
At Mylikeled, we offer various connectors suitable for different types and widths of LED strips, along with LED drivers and controllers, to enhance your lighting projects. With our comprehensive range of high-quality LED products, we provide all the essentials for connecting multiple LED lights effectively.
FAQs
Can one LED controller handle different types of LED strips?
Not always. It depends on the voltage and type of the LED strips. For example, a 12V controller can’t power 24V strips. Always make sure the controller matches the LED strip’s voltage and color type (like RGB or RGBW).
How many LED strips can I connect to one controller?
This depends on the power rating of your controller. Each LED strip uses a certain amount of watts, and your controller has a maximum output it can handle. Add up the total wattage of your strips and make sure it’s within the controller’s limit.
Do I need an amplifier when using multiple LED strips?
Yes, if you’re running a lot of LED strips and notice dimming, flickering, or color loss, an amplifier can help. It boosts the signal and power so all the strips work properly, especially if they’re far from the controller.
Can I use one power supply for multiple LED strips?
Yes, but only if the power supply has enough wattage to support all the strips. You’ll need to calculate the total power needed by adding up the wattage of each strip and make sure the power supply can handle that amount comfortably.
What happens if I overload an LED controller?
If you connect too many LED strips and exceed the controller’s capacity, it might overheat, shut down, or even get damaged. Always stay within the recommended limits to keep things safe and running smoothly.

Hi, I’m Xylia Xiong, a sales professional with 14 years of experience in the LED strip light industry. I specialize in providing tailored solutions, leveraging my expertise in LED products and the latest industry trends. Known for effective communication and problem-solving, I’m dedicated to helping lighting manufacturers, importers, and distributors achieve their goals.
Let’s work together to create customized solutions that exceed expectations.
Related Posts
The Best LED Strip Lights You Can Buy Right Now
Comparing WS2811 Vs WS2812B: Key Differences


