LED Strip Connectors are crucial in ensuring a seamless and professional installation in the world of LED strip lighting. Whether creating a cozy ambiance in your living room or adding accent lighting to your kitchen, the right connectors can make or break your project. Understanding how these connectors work and knowing which type to use can simplify your installation process and improve the overall performance of your LED strips.
In this guide, we’ll break down the importance of LED strip connectors and provide an overview of the available types, making it easy for beginners to confidently tackle their next lighting project.
The Importance of Connectors in LED Strip Installations
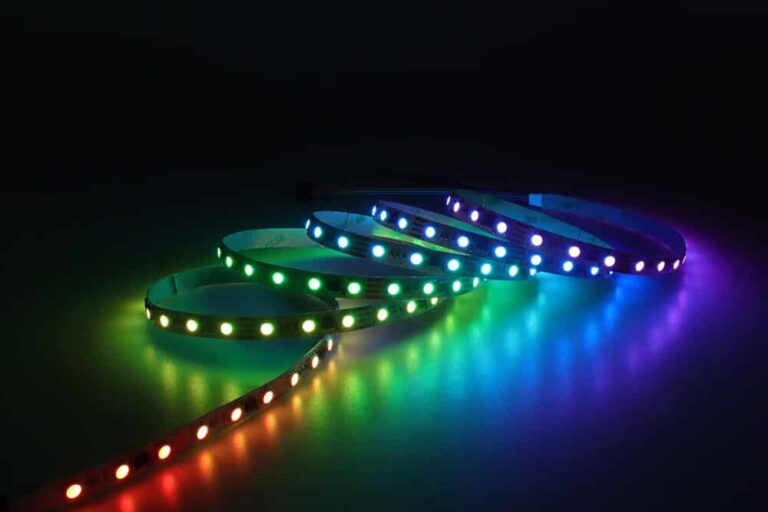
LED strip connectors are the unsung heroes of any lighting project. These small yet essential components allow you to join multiple LED strips together, connect strips to power sources, and easily navigate around corners or obstacles. Without the right connectors, you may struggle with soldering or dealing with unreliable connections that can lead to flickering or dimming lights.
Using the correct connectors ensures a stable and consistent power supply and preserves the integrity of your LED strips, prolonging their lifespan. Additionally, connectors enable clean, professional-looking installations without the need for complex wiring or specialized tools. For beginners, they offer a simple, plug-and-play solution that removes the guesswork of LED strip lighting.
Overview of the Types of LED Connectors
LED strip connectors come in various types, each designed for specific applications. Here’s a closer look at the most common types:
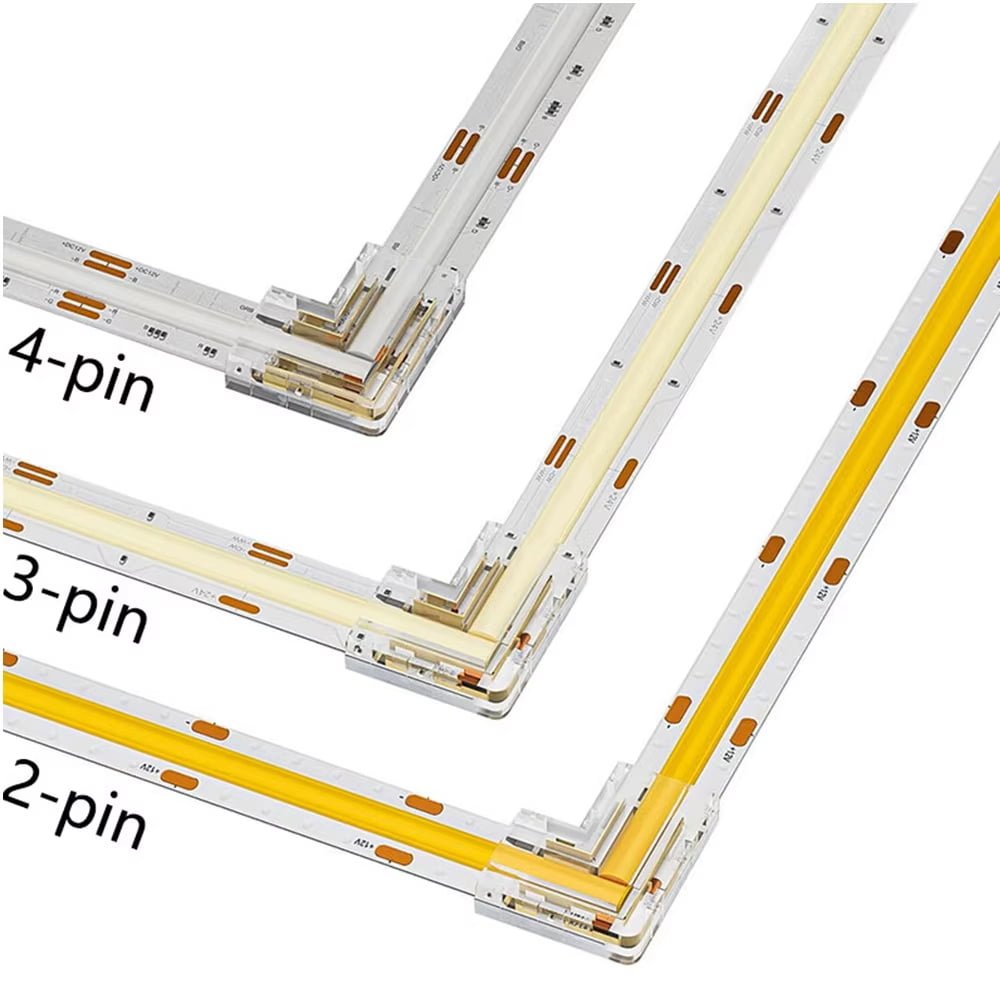
1. Two-Pin Connectors
Two-pin connectors with single-colour LED strips operate on a positive and negative connection. These connectors are straightforward and perfect for simple projects where you only need to power a single color strip. They typically consist of a small plastic clip that holds the LED strip and a pair of metal pins that connect to the strip’s copper pads.
2. Four-Pin Connectors
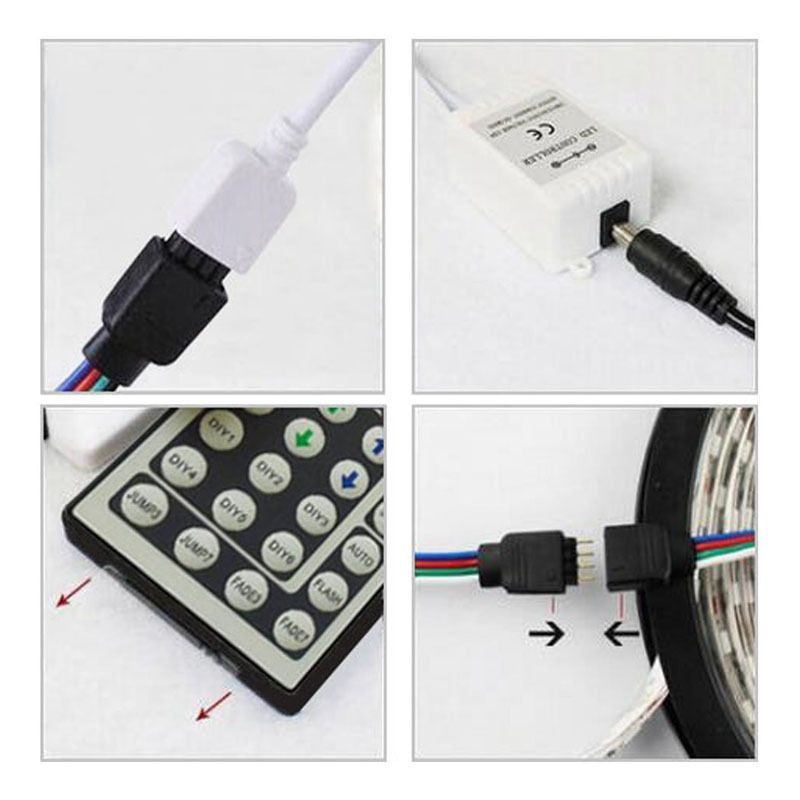
Four-pin connectors are designed for RGB (Red, Green, Blue) LED strips, which require four connections: one for each color and common ground. These connectors allow you to control the color and intensity of the light, making them ideal for projects that require dynamic, multi-color lighting. Like two-pin connectors, they are easy to use and involve clipping the LED strip into place.
3. Corner and Angle Connectors
Corner and angle connectors are invaluable when your LED strip installation requires navigating around corners or making sharp turns. These connectors are designed to join two strips at a 90-degree angle without bending or damaging the strips. They maintain a continuous electrical connection while allowing you to achieve precise, clean lines in your lighting design.
4. Splitter Connectors
Splitter connectors allow you to run multiple LED strips from a single power source. They are especially useful in larger installations where you must power several strips simultaneously. Splitters typically come in “Y” or “T” shapes, making it easy to branch out in different directions without compromising the power supply.
5. Extension Cable Connectors
Extension cable connectors bridge a gap between two LED strips or extend the distance between the power source and the LED strip. These connectors come in various lengths and are essential for installations that cover large areas or have obstacles that require spacing out the strips.
6. Solderless Connectors
For beginners, solderless connectors are a game-changer. These connectors eliminate the need for soldering, making the installation process faster and more accessible. Clip the LED strip into the connector, ensuring the metal pins make contact with the strip’s copper pads, and you’re good to go. Solderless connectors are available in both two-pin and four-pin configurations and in various shapes and sizes to suit different needs.
Types of LED Strip Connectors
1. Pin Connectors
Pin connectors are the most common and essential in LED strip lighting installations. These connectors feature small metal pins that align with the copper pads on the LED strip, allowing for a secure electrical connection. Pin connectors come in various configurations, including two-pin for single-color strips and four-pin for RGB (Red, Green, Blue) strips.
How to Use Pin Connectors:
- Align the pins with the corresponding pads on the LED strip.
- Carefully insert the pins into the strip’s pads, ensuring the connection is tight and secure.
- Once connected, you can link multiple strips together or attach them to a power source.
Pin connectors are ideal for those looking to extend their LED strips or connect multiple strips in a series. They provide a reliable connection, ensuring consistent power flow and preventing flickering or dimming.
2. Solderless Connectors
Solderless connectors are a beginner-friendly option that eliminates the need for soldering, making the installation process quick and easy. These connectors come with a simple clip mechanism that allows you to connect LED strips without any tools or technical expertise. They are available in various configurations, including two-pin, four-pin, and even five-pin for more advanced LED strips with additional channels.
How to Use Solderless Connectors:
- Open the clip on the solderless connector.
- Insert the LED strip into the connector, ensuring the copper pads align with the metal contacts inside the connector.
- Close the clip securely, locking the strip in place.
Solderless connectors are perfect for DIY enthusiasts and professionals, offering a hassle-free way to connect LED strips. They are useful for creating quick connections in tight spaces or working with multiple strips.
3. Clip-On Connectors
Clip-on connectors are similar to solderless connectors but are specifically designed to provide an extra-secure connection. These connectors feature a clip mechanism that clamps down onto the LED strip, holding it firmly in place. Clip-on connectors are available for single-color and RGB strips and are ideal for installations where the LED strips may be subject to movement or vibration.
How to Use Clip-On Connectors:
- Slide the LED strip into the connector, aligning the copper pads with the metal contacts.
- Press down on the clip to secure the strip in place.
- Ensure that the connection is tight and that there is no strip movement within the connector.
Clip-on connectors offer added security and durability, making them suitable for installations in areas with frequent movement, such as under-cabinet lighting in kitchens or commercial environments.
How to Choose the Right Connector for Your LED Strip Lighting
Selecting the right connector for your LED strip lighting project ensures seamless installation and long-lasting performance. Here are some key factors to consider when making your choice:
Compatibility
- LED Strip Type: The first and foremost consideration is compatibility. Ensure that the connector you choose matches the type of LED strip you’re using, whether it’s a single-color (two-pin), RGB (four-pin), or more advanced LED strip. Using an incompatible connector can result in poor connections, leading to flickering lights or even damage to the strips.
- Voltage: Make sure the connector is compatible with the voltage of your LED strip, typically 12V or 24V. Using the wrong voltage connector can cause the LED strip to malfunction.
Flexibility
- Installation Environment: Consider the environment where the LED strip will be installed. Flexible connectors like corner connectors or clip-on connectors are ideal if you’re working in tight spaces or need to navigate around corners. They allow you to make clean turns and bends without damaging the strip.
- Project Scope: For larger projects where multiple strips need to be connected over a distance, opt for connectors that offer flexibility in length, such as extension cables or splitter connectors. These options allow you to extend your lighting setup without compromising performance.
Ease of Use
- Skill Level: Assess your skill level and comfort with electrical work. If you’re a beginner or prefer a simple installation process, solderless or clip-on connectors are excellent choices. They don’t require special tools or expertise and offer a plug-and-play solution.
- Installation Time: If time is a factor, solderless connectors can significantly reduce installation time. They eliminate the need for soldering, making them quick and easy to use, even for complex setups.
Comparing Soldered vs. Solderless Options

When choosing between soldered and solderless connectors, each option has advantages and is suited to different projects.
Soldered Connectors
- Pros:
- Durability: Soldered connections are known for their robustness and reliability. Once soldered, the connection is permanent and less likely to come loose, making it ideal for installations where the LED strips may be subject to movement or vibration.
- Customizability: Soldering allows for a high degree of customization, enabling you to create bespoke connections and configurations tailored to your needs.
- Cons:
- Skill Required: Soldering requires technical skill and the right tools, such as a soldering iron and solder. It’s not the best option for beginners or those unfamiliar with electrical work.
- Time-Consuming: Soldering can be time-consuming, especially for larger projects requiring multiple connections.
Solderless Connectors
- Pros:
- Ease of Use: Solderless connectors are incredibly user-friendly, making them ideal for beginners and quick installations. No special tools or expertise are required—clip the connector onto the LED strip, and you’re done.
- Quick Installation: These connectors significantly reduce installation time, allowing you to complete your project faster without sacrificing quality.
- Cons:
- Less Durable: While solderless connectors are convenient, they may not be as durable as soldered connections, especially in environments where the strips may be moved or jostled frequently.
- Limited Customization: Solderless connectors are generally less customizable than soldered ones, as they come in pre-set configurations that may not fit all projects.
Step-by-Step Guide to Connecting LED Strips with Different Types of Connectors
Connecting LED Strips with Different Types of Connectors
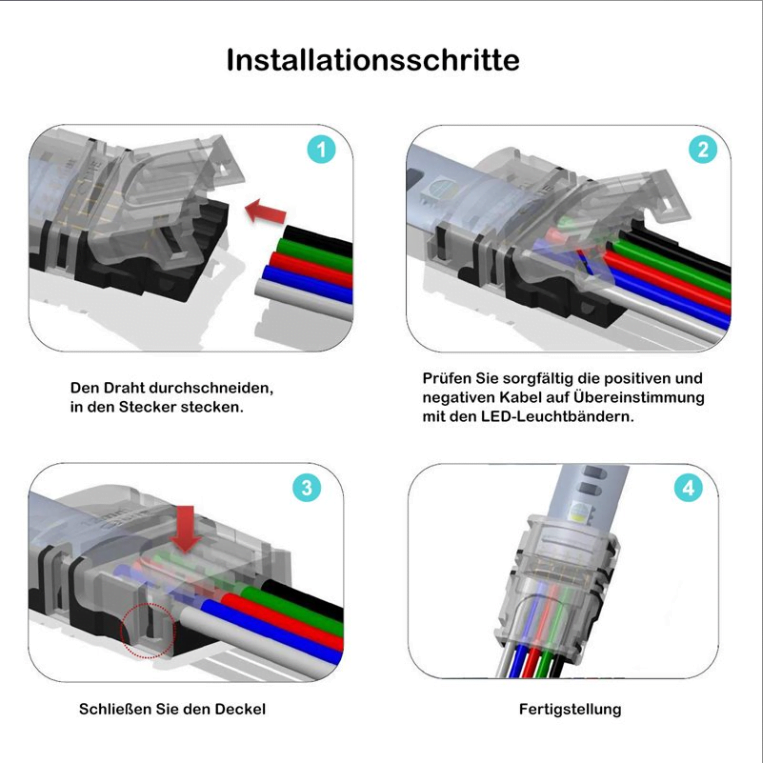
Using Pin Connectors:
- Step 1: Prepare the LED Strip: Ensure that the end of the LED strip is clean and the copper pads are exposed. If necessary, trim the strip at the designated cutting line.
- Step 2: Align the Pins: Open the pin connector and align the metal pins with the copper pads on the LED strip. Ensure the polarity (+ and -) matches the strip’s markings.
- Step 3: Secure the Connection: Press down on the connector clip to close it, ensuring the pins are firmly in contact with the pads. You should hear a click, indicating the connector is securely fastened.
- Step 4: Test the Connection: Plug the LED strip into the power supply and turn it on to test the connection. If the strip lights up correctly, the connection is secure.
Using Solderless Connectors:
- Step 1: Prepare the LED Strip: Trim the LED strip at the designated cutting line if necessary, ensuring the copper pads are exposed and clean.
- Step 2: Open the Connector: Open the solderless connector by lifting the clip. Make sure the connector’s metal contacts are visible.
- Step 3: Insert the LED Strip: Carefully insert the LED strip into the connector, aligning the copper pads with the metal contacts inside. The strip should fit snugly without forcing it.
- Step 4: Secure the Clip: Close the clip to lock the LED strip. You should feel resistance as the contacts press against the copper pads.
- Step 5: Test the Connection: Connect the strip to the power supply and turn it on. If the lights work as expected, the connection is secure.
Using Clip-On Connectors:
- Step 1: Prepare the LED Strip: Ensure the end is trimmed cleanly at the cutting line, with the copper pads fully exposed.
- Step 2: Align the Strip: Open the clip-on connector and position the LED strip so that the copper pads align with the metal contacts.
- Step 3: Close the Clip: Press down on the clip to secure the LED strip in place. The clip should hold the strip firmly, ensuring a solid connection.
- Step 4: Test the Setup: Power the LED strip to verify the connection works correctly.
Tips for a Secure and Effective Connection
- Ensure Proper Alignment: Always double-check that the copper pads on the LED strip align perfectly with the connector’s metal contacts. Misalignment can lead to poor connections and inconsistent lighting.
- Use Quality Connectors: Invest in high-quality connectors that match the specifications of your LED strips. Poor-quality connectors can result in unreliable connections and reduced performance.
- Avoid Excessive Bending: When connecting strips, avoid bending them excessively, especially near the connectors. This can damage the strips and cause the connection to fail.
- Test Connections: Always test your connections before finalizing the installation. This will help you identify any issues early and avoid rework.
Troubleshooting Common Issues
- Issue: LED Strip Doesn’t Light Up
- Solution: Check the polarity of the connection. Ensure the positive and negative sides align correctly between the strip and the connector. Also, verify that the power supply is functioning properly and providing the correct voltage.
- Issue: Flickering or Inconsistent Lighting
- Solution: Flickering can result from a loose connection. Recheck the connectors to ensure they are securely fastened and that the pins or contacts make good contact with the copper pads. If using multiple strips, ensure the power supply is sufficient to support the total load.
- Issue: Dim Lighting
- Solution: Dim lighting can occur if the connectors are not properly aligned or the power supply is inadequate. Double-check the connection points and ensure that the power supply meets your LED strips’ voltage and current requirements.
- Issue: Only Part of the LED Strip Lights Up
- Solution: This is often due to a break in the circuit. Check the connectors and the LED strip for any damage or misalignment. Replace the connector if necessary, and make sure the strip is not damaged at the connection points.
Safety Tips for Connecting LED Strips
When working with LED strips, proper insulation, and secure connections are critical to preventing electrical hazards and ensuring the longevity of your installation. Here are some essential safety tips:
- Use Insulated Connectors: Always choose connectors that come with adequate insulation. This prevents accidental contact with exposed wires, which could lead to short circuits or electric shocks. If you use connectors without built-in insulation, consider adding heat shrink tubing or electrical tape around the connections for added safety.
- Secure Connections: Ensure that all connections are tight and secure. Loose connections can cause arcing, where electricity jumps across gaps, potentially leading to overheating or fires. Double-check that the metal contacts in the connectors are properly aligned with the copper pads on the LED strip and that the connectors are fully closed and locked in place.
- Protect Exposed Wires: If your installation involves exposed wires, such as when using extension cables, ensure these wires are properly insulated and away from any metal surfaces that could cause a short circuit. Route the wires to minimize the risk of them being pulled or damaged during regular use.
Avoiding Short Circuits and Electrical Hazards
Short circuits and electrical hazards are serious concerns when working with electrical components, including LED strips. Follow these tips to minimize risks:
- Check Polarity: Always ensure the positive and negative connections are aligned correctly. Reversing polarity can cause the LED strip to malfunction or damage the LEDs. Most connectors and LED strips have markings to help you identify the correct polarity.
- Use the Correct Power Supply: Make sure that your power supply matches your LED strip’s voltage and current requirements. An incorrect power supply can lead to overheating, short circuits, or fire hazards. It’s also important to ensure that your power Is adequately ventilated and not placed in a confined space where heat can build up.
- Avoid Overloading Circuits: When connecting multiple LED strips, be cautious not to exceed the power capacity of your power supply. Overloading the circuit can cause the power supply to overheat or fail, leading to potential electrical hazards. Use multiple power supplies or a more powerful one that can handle the total load if needed.
- Prevent Moisture Exposure: If installing LED strips in areas prone to moisture, such as kitchens or bathrooms, ensure the LED strips and connectors are rated for wet locations. Water-resistant or waterproof LED strips should be used in these environments, and all connections should be sealed to prevent moisture ingress.
- Inspect Before Powering On: Before turning on the power, visually inspect all connections, wires, and the power supply. Ensure there are no exposed wires, loose connections, or signs of damage. It’s better to catch any issues before powering on to avoid potential hazards.
Conclusion
LED strip connectors are essential tools that can transform your lighting projects from ordinary to extraordinary with ease and safety. By understanding the different types of connectors, ensuring proper installation, and following essential safety tips, you can create seamless, professional-looking LED lighting installations that enhance any space.
Recapping the key points:
- Types of Connectors: From pin connectors to solderless and clip-on connectors, each type offers unique benefits depending on your project’s needs.
- Installation Guide: A step-by-step approach ensures secure and effective connections, whether you’re a beginner or an experienced DIYer.
- Safety First: Proper insulation, secure connections, and avoiding short circuits are crucial for a safe and successful LED strip installation.
Now that you know, don’t hesitate to experiment with LED strip connectors in your next lighting project. If you want to add accent lighting to your home, brighten up a workspace, or create a stunning visual display, the right connectors will help you achieve your vision confidently and easily.
Contact us for the best LED strip connectors available at MyLikeLed, and start bringing your creative lighting ideas to life today!

Hi, I’m Xylia Xiong, a sales professional with 14 years of experience in the LED strip light industry. I specialize in providing tailored solutions, leveraging my expertise in LED products and the latest industry trends. Known for effective communication and problem-solving, I’m dedicated to helping lighting manufacturers, importers, and distributors achieve their goals.
Let’s work together to create customized solutions that exceed expectations.